


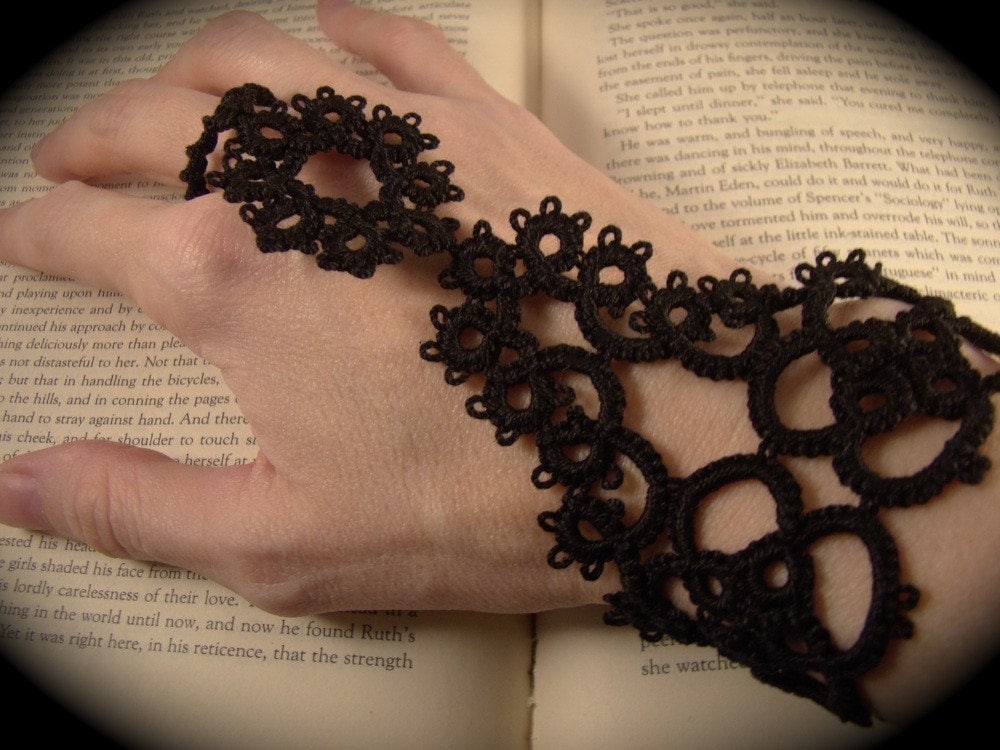
 I promised you one last free pattern as a holiday gift. Yes, I'm aware as gifts go, it's a little lame, sort of like handing someone stereo instructions and no stereo. However, I think that some of you out there will like it a bunch. This pattern was written up as a request from someone, so it's not been tatted up by a bunch of people who tell me what I did wrong, so be warned and feel free to share any mistakes you find and I'll correct them here with a note as to the changes if any. This was my first slave bracelet design, recently featured as my bridal slave bracelets in the Etsy Storque. As always I provide the pattern for personal use only, if you'd be so kind!
Slave Bracelet Pattern:
Size 10 thread, size 5 needle or two shuttles
You will need two hooks closures, size 3 I believe. Instead of using the eye portion, I hook directly onto the lace to close the bracelet.
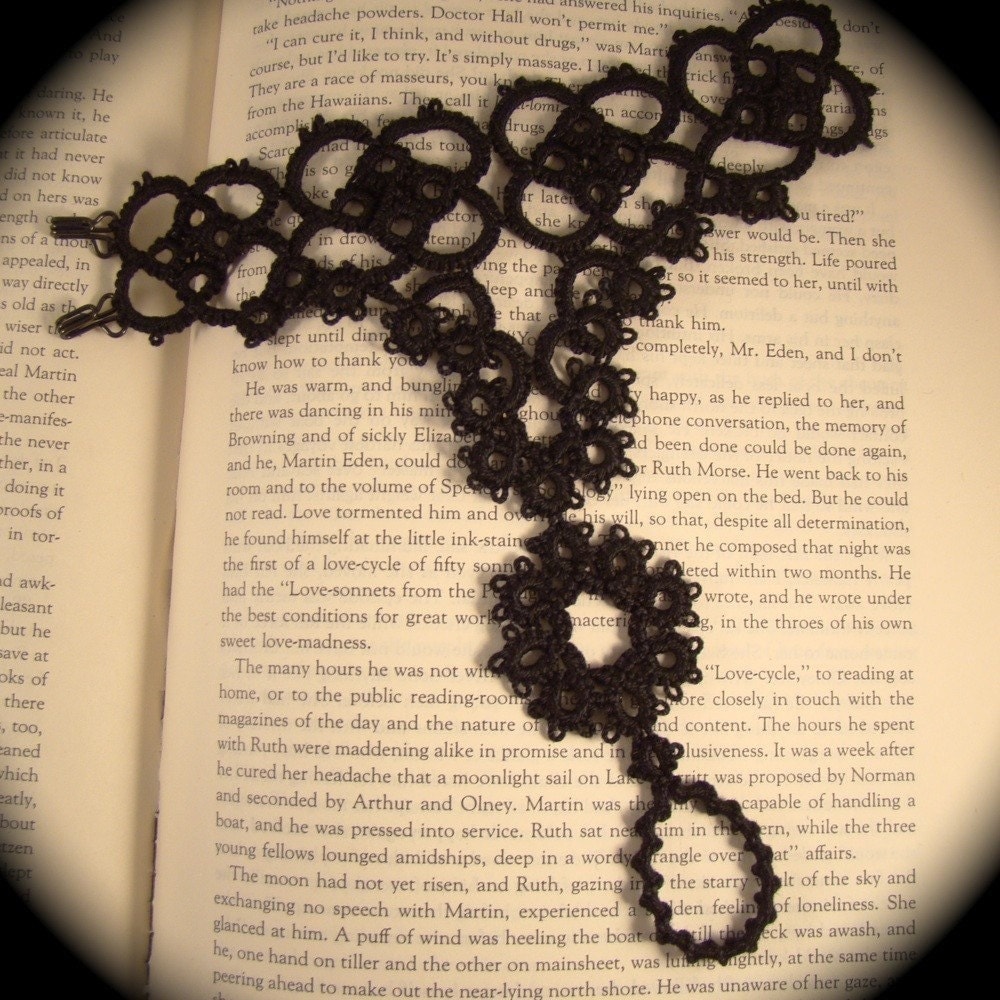
R 3-3-3-3 cl rw, Ch 6 cl rw, R 3-3-3-3 cl rw, Ch 6-5 join to first loop of hook 2 join to second look of hook 5 cl rw, R 3 join to last picot of previous ring 3-3-3 cl rw, ch 5 add hook 2 add hook 5-2-6 cl rw, R 3+3-3-3, ch 6-2-6-6 cl rw, R 3+3-3+3 cl rw, Ch 6 cl rw, R 3 join to side picot of first ring 3-3-3 cl rw, Ch 6 cl rw, r 3-3-3-3 cl rw, ch 6 join to opposite ch 6-2-6 cl rw, r 3+3-3-3 cl rw, ch 6-2-6-6 cl rw, 3+3-3-3 cl rw, ch 6-6-6 cl rw, r 3+3-3+3 cl rw, ch 6 cl rw, r 2-2 join to side picot of ring 2-2-2-2 cl rw, ch4 cl rw, R 2-2-2-2-2-2 cl rw, ch 6 join to opposite chain6-6 cl rw, r 2-2+2-2-2-2 cl rw, ch 6-6 cl rw, r 2-2+2-2-2-2 cl rw, ch 4 cl rw, r 2+2-2-2-2-2 cl rw, ch 4 cl rw, r 2+2-2-2-2-2 cl rw, ch 4 cl rw, r 2+2-2-2-2-2 cl rw, ch 4 cl rw, r 2+2-2-2-2-2 cl rw, ch6 join to opposite chain 6 cl rw.
Continue working as a mirror to the first half. When you get to the end, instead of adding hooks just tat the picots instead.
Center Motif: 8 rings of 5p sep by 2ds and 4ds chains. Join to bracelet by center picot of rings.
Finger loop: R 3-3 join to center motif 3-3 cl rw, Make a josphine knot ring of about 150 jk. You can adjust the number to fit your hand.
 This bracelet will fit a smaller wrist, to make it fit larger, I've used several methods depending on the size needed, A row of three split rings attached to either end is the easiest, but if you plan on doing so, you will need to add your hooks to this section rather that the main one. You may of course leave off the hooks entirely and use a ribbon to lace and tie shut eliminating the sizing need. If you've any question or comments, please do leave them!


29 comments:
Thanks!! What a lovely Christmas Present. Have a Merry Christmas and a Great New Year.
You're the best! (at least until I start cursing you because I made a mistake! lol)
Awww...gee, thanks! That's a fabulous gift!
I think you're being exceptionally generous. Thank you!
All your pieces are exceptionally beautiful and having a pattern for one of them is a great gift! Have a wonderful season!
Oooh, another wonderful pattern! Thank you so much for sharing... :)
Thank you for this and the barefoot sandals pattern. Very,very generous to give away a pattern you make up to sell yourself.
Happy Holidays
Connie
I told my brother, over my niece's head, that if someone told me her wrist size then I'd make one. He replied in a similar vein.
First, Thanks for the lovely patterns. I am new to tatting, and your pendant on Instructables is what piqued my interest. I am attempting to make this slave bracelet, but when I get to R 3+3-3+3 cl rw I am lost. I don't know what I am doing wrong, but it never looks right. Am I possibly missing something? Thanks for your time & advice.
Sandi...I'm not certain what the problem might be, that is the forth of the center rings, I assume and it must be joined to the ring before it by the first picot and the 1st ring by the last picot. Sometimes joining around can be fiddly keeping everything in the right direction, but that's all I can think of to help.
Thank you, not sure where I was messing up but am on the right track now!
Piękne prace! Bransoletka jest wspaniała!
what does all the caps and numbers and dashes mean? i don't understand =D
Hi That looks great its going to be my next project as I slowly work up to making your mask. Its going to be very slow but hey I only started tatting 2 days ago! One question though I'm such a newbie but how much tail will you need? I can never work out how much tail will be needed for each project. Thanks
I usually pull out an arms length to be safe. Honestly it's just something you can eventually guess after practice, I never really measure though I know some people know exactly how much...not me.
Thank you... you're the best..
Yoke from Belgium
doing it right now. had to switch josephine knot ring to ring of split rings because i couldn't make normal ring of jk.
we'll see how'll i manages rest of it. the center motif and the ring is ready
Hi, I want to make the slave bracelets and the barefoot sandals but I don't know which one. i am probably an advanced beginner. which one do you think would be easier for me?
@Bebe I think I would start with the bracelet first.
i cannot understand this at all :(
I wanted to say thank you, I just learnt needle tatting last week and I've been playing around with it and I have fallen in love. I'd really like to make this for my oldest girl but I got stuck at Ch 6-5 join to first loop of hook 2 join to second look of hook 5 cl rw, the rest I can figure out though. Thank you in advance :)
@Melinda Thanks! That is the point where your are joining to metal hook. You tat the ds's and then join to one loop at the bottom of the hook, tat a couple ds's then join to the other loop on the metal hook and finish the chain. I hope that makes sense.
Made complete sense thank you again for such a quick response!
absolutely love the slave bracelet! Thanks for the pattern. I didn't pay attention to the size of the thread (rookie mistake I know!) and did it in a size 30. It fits my 2 year old beautifully! Too bad it was supposed to be for my 17 year old niece. Guess I get to tat it again! Thanks so much for the patterns, I love your style!
Hello there,
I would like to begin by apologizing foe posting a question on such an old post :)
Anyways, so, I LOVE this pattern, but I have been putting it off for a while now. Well, I'm ready to start! So, I just need a little help understanding the pattern here.
I should probably mention I am a shuttle tatter, which may explain why am not quite 'getting' what to do.
Near the beginning, when it says 'Ch 6-5 join to first loop of hook 2 join to second look of hook 5 cl r', I don't know what it means there, where or what it wants me to join to. Any help would've greatly appreciated, and thanks for all of the amazing tatting a,
@Phillip That is where you are joining your work to the metal hook used to close the bracelet. You can ignore this section and just tat up all the stitches as a single chain if you choose to use a different clasp or closure.
Ahh, thank you! It all makes sense now! And thank you very much for the speedy reply, keep up the good work!
Thanks for posting this patten. I struggled a little with reading the pattern but got it in the end by looking closely at the photo :)
Considering I've only been tatting just over a week I'm proud! I've posted a picture on my in tatters blog and tagged you!
Look forward to making more pieces:)
i got my tatting needles via eBay, cheaper than at Handy Hands, even with the shipping. looking forward to learning and attempting your amazing patterns, as well as the antique ones. i've done a lot of crocheted lace from those books, so i know what i'm in for. thanks again for this great blogsite!
Post a Comment